
Kitec plumbing is a type of plumbing used in the time period of 1995-2007. Manufactured by IPEX it was composed of a thin aluminium layer sandwiched between two layers of plastic and was easy to handle and install. After a period of time, people were experiencing failures at the fittings or pipes themselves. This resulted in leaks that caused damage to many homes. It is said that problems began when the zinc concentration of the brass fittings that were used was changed and this is when problems began to occur from corrosion where the pipe and fittings made contact. Water chemistry also plays a big part in this equation as some areas of the continent were experiencing failures at accelerated rates compared to others. That said, the general consensus is not if there will be a failure, but when.
How do I know I have Kitec? 95% of all Kitec is Orange in colour for Hot water and blue for cold water. The pipe is usually marked with one of the following brand names; Kitec, Kitec Xpa, XPA, PlumbBetter, Ipex aqua, WarmRite, Ambio Comfort, KERR Controls or Plomberie Améliorée. Fittings often have Kitec or XPA stamped on them. Usually, the best places to look for the Kitec system is near the hot water tank or in the utility room where the pipe is connected to or exits the walls. Checking under kitchen sinks or bathroom vanities is also good. The mark of a certification agency like the Canadian Standards Association has the marking CSA 137.9/10. Other types have this marking too, so if unsure have your plumber check it out.
 I have Kitec plumbing, what should I do? If you suspect you have Kitec plumbing, contacting a plumber that has experience in dealing with this material and installation is recommended. There are specialists out there that just specifically deal with the removal of this product; such as kitec.ca. They remove and replace the Kitec with either Copper or Pex A plastic plumbing, depending on the area and scenario. They have it tested andcertified by an Engineer. They then refinish and clean up the work areas leaving your home looking like nothing was ever done. There was a recall issued back in 2005/06 and a Class action Lawsuit was filed against the Manufacture. A $125 million settlement was agreed upon and more info can be found at http://www.kitecsettlement.com/index.cfm. The average cost for removal can vary on the home and complexity of the job. A 600-700 sq/ft Condo can average $5000 to $8000 and larger home naturally more. I hope this information is helpful and be sure to click on the links for more information.
Your attic hatch, something that really never gets any attention and all too often is forgotten. However, your attic hatch is important. Often and commonly located in walk-in closets, rear bedroom closets or hallways, It allows you access to your attic space to annually inspect the underside of your roof and see how it is performing.  Are there any leaks or staining observed in the roof sheathing? Are there any signs of possible mould growing? Has any of your structural roof members become loose? Are your bathroom vents insulated and terminating to the exterior through the roof or are they spilling air into your attic? When poking your head and/or upper body into your attic, do you feel any movement of air? Are there any signs of pests in your attic; such as mice droppings or evidence of larger pests like squirrels and raccoons? Obviously, with these larger pests, you can hear them move around in your attic anytime of the day or night. Mice tend to be more active in the night when you’re sleeping and you may hear movements and them nibbling on plastic vapour barrier, paper insulation backing or worse, electrical wiring. When it comes to attics the old saying “out of sight, out of mind” can never be truer.
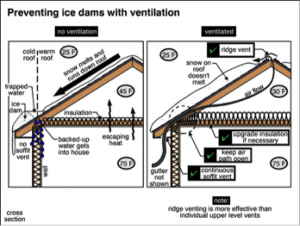
Your attic hatch must be weather stripped around the perimeter of the opening and have good amounts of insulation on top of it to reduce the transfer of air and heat energy into your attic.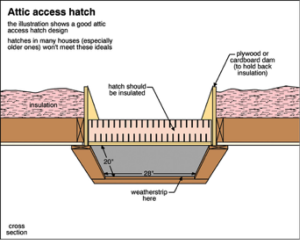 There are several approaches in how to treat your attic space, but the most common in our area of the GTA is to treat the attic space like it is the outdoors. So we try to maintain the attic temperature as close as possible to the temperature outside and we achieve this with excellent ventilation and use a good performing vapour/air barrier along with good amounts of insulation to separate the living space and the attic space. When this is all done and completed, it works as a unit and reduces heated or cooled air you paid for from escaping into the attic. This also minimizes the possibility of ice damming during the winter on your roof.
 Often times during inspections when attic hatches aren’t insulated or weather-stripped, I will observe the beginning stages of possible mould or mildew above the area of the hatch on the underside of the roof sheathing. In some rare cases where the attic ventilation is poor, you will see more. Sometimes I have observed cases where the ventilation in the attic is so good that any heated air entering the attic just simply gets flushed out the Roof vents. You might ask yourself “why does this happen?” Well many times during the winter months warm heated air that you have paid for, will escape into the attic through your non weather stripped hatch and cool and condense on the structural members or under the roof sheathing and get wet and freeze. During the spring it will thaw, stain and in worse cases delaminate the sheathing over the long term. In other cases, you have possible mould or mildew growth. Every home and scenario are unique and so are their attic spaces and how they perform. So be sure to have a look and inspect your attic hatch. Make sure it is insulated and weather stripped. If it is not, buying some foam tape and coffee cup type insulation board (Expanded Polystyrene) or any other type, cut it to size and glue it together and voila…You have a nice weather striped and insulated attic hatch.
It is that time of year when summer approaches and we spend time on our gardens and lawns preparing them for summer; we also need to focus some attention on our Air Conditioning units. One of the most common questions I get asked about the A/C condensers outside is, “Should I cover my unit during the winter?” My answer to that question has always been that there are two schools of thought on the subject. Some say it’s best to leave it uncovered as it is designed to be exposed to the outdoors, and others say it is best to cover it. I believe there is some truth in both answers. If you are going to cover the unit, make sure you use a cover that is designed from the manufacturer for your condenser as it allows air to move and not trap moisture inside. Trapped moisture would of course over the long term add to the quicker development of corrosion and is one main reason why to never rap your condenser in plastic as I see sometimes done. I personally place a piece of plywood over my condenser and add a heavy rubber mat on top of that. You can use a few bricks as well to keep the plywood from moving. This setup prevents snow, ice, and debris from accumulating on the fan blades and allows air to circulate.
 Now back to preparing your A/C for summer. If you’re not very handy or your unit is older than five years old or you suspect a drop in performance; I would suggest having your HVAC technician come in and further evaluate your system. This would go beyond a simple clean up. However; if your unit has been performing consistently well, then a simple clean up should do. Firstly, turn off the power to your unit in the electrical panel. Remove your cover outside and visually check your condenser coil for any damage to the fins and dirt. If your fins are dirty you will need to clean them or if damaged you may purchase a fin comb or better yet, call your HVAC technician to help straighten them. Bent or damaged fins reduce performance in the heat transfer process.
If they are dirty, then simply running a hose with a light stream of water to help remove dirt and dust from in between the fins should be sufficient. Never use a pressure washer to clean your condenser as this could damage or bend the fins. There are also commercial foaming detergents that one could spray on the condenser coils to help dislodge dirt and debris from between the fins and then simply rinsed off. 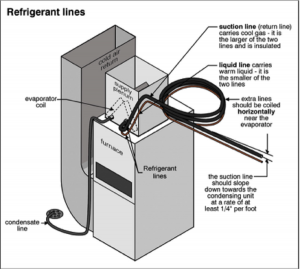 This is something your technician may do to your Evaporator coil above the furnace every so often. This coil is not easily accessible and only your HVAC tech should clean this one when necessary. All the more reason to change your furnace filter religiously and reduce dirt and dust build up on your A/C evaporator coil.
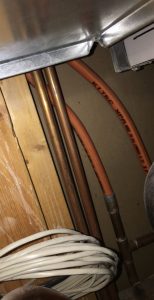
Back to your exterior condenser coil; now that you have given her a good rinse, check your refrigerant lines for damage. You will see a large insulated suction line and a thinner liquid line. These lines are connected to your condenser unit and enter the home through the wall back to your evaporator coil above your furnace. These lines carry the refrigerant and transport the heat from your house and dump it outside via your condenser and fan. It’s all part of the refrigeration cycle. Any damage or kinks to these lines can lead to leaks or reduced performance and should be further evaluated by your Heating, Ventilation and Air Conditioning technician, and repaired as necessary. If they aren’t damaged, check the condition of the insulation on the thicker suction line. This insulation tends to deteriorate in the outdoors and sun. If it has lost its softness or flexibility, go to your hardware store and buy some in the plumbing section. 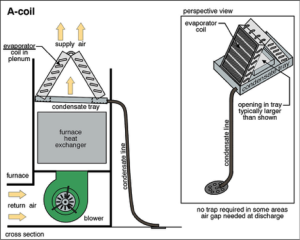 Take a small sample of the old one with you so you get the correct size. Now once you are done on the outside, go down to your furnace room and locate your condensate line and make sure it is clean and free from debris. Some of these lines are black plastic and you won’t be able to see any dirt. You either need to disconnect it and run water through it to flush it, listen and observe it during operation or simply once again call your HVAC tech. Check for any signs of water stains or rust on the cabinet which could be a sign of a leak somewhere. If you see any, call your HVAC tech immediately and have them further evaluate it.
That is basically your A/C maintenance and steps needed to monitor your performance and condition of your Air conditioning system in your home. Remember, never operate your system when the temperature has been below 16-18*C over a 24 hour period. Doing so could damage your compressor in the Condenser Unit outside. Lastly, if ever you feel doing any of the maintenance steps is above your ability or confidence level, then always call your Technician to come and do it for you. 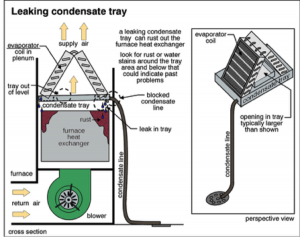 When he or she does, observe them so that you can learn and don’t be afraid to ask questions. The more your learn about your home, the better prepared you will be able to maintain its various systems and components. Now Go out there and give the TLC your A/C system deserves. A clean system reduces cost and increases performance. See you next time.
Managing surface water around your home is very important when it comes to maintaining your home. Water is extremely important on our planet, without it we would not have life. However, when it comes to your home, water can cause many problems. Water penetration into your home can damage interior finishes, structure and seriously affect your health if allowed to occur long enough where mould and other organisms can grow. It also can invite pests as well.
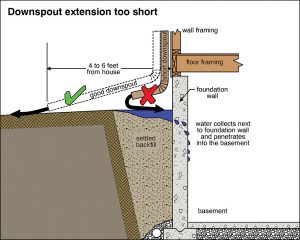
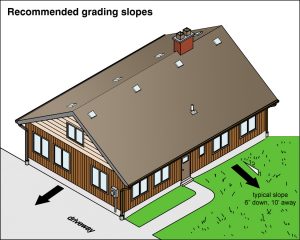
As we enter the spring season we will encounter increased days of rain, some days this rain will be accompanied by high winds. This is the time to get out your umbrella and see how surface water behaves around your home. It is also important to see how your Roof and Gutter systems perform in shedding and collecting that water away from the building. The basic rule is keeping water away from the exterior perimeter. Keeping this in mind, it is good practice to go outside during a rainfall and look at your gutters and see if there are any leaks that need to be repaired and make sure your downspouts have extensions on them and are displacing the water 4-6 ft(1.2m-1.8m) away from your home. Also, check to see if there is any water pooling or draining backward toward your home’s foundation. If so, you will need to regrade the soil so that water sheds away from the home. Keeping water away from your foundation wall minimizes the probability of water making its way into your basement. If you have window wells for your basement windows, then removing debris and cleaning them is important. To reduce having to do this, you may look into getting window well covers. Furthermore, try to maintain a 6″ distance from the gravel to the bottom of your window sill.

All these small practices help keep water out of your basement and help preserve your exterior. It is also a great idea to have a look at your roof as well and check for any damaged or deteriorated shingles. Your roof tends to take a beating during the winter months from snow, ice, and wind. Sometimes, shingles are blown off. Grab a pair of binoculars and look at your Roof and see if you can find any damaged shingles or tabs that are missing. I always like to recommend an annual or biennial tune-up by a professional roofer who is trained to work at heights and can have a better look up close of your roofing system and safely make any necessary repairs, or simply reapplying sealants to exposed nail heads or flashings; such as, around chimneys. These tend to dry and crack with time.
I hope these tips will give you something to think about and help raise your awareness of your home and what is necessary to keep it in good condition so that you may enjoy it for many years to come. Home maintenance is just like maintaining your car; the more you take care of it, the longer it will last with minimal headaches.
Antonio Coelho NCI RHI
Ancoe Property Inspections
There are several good things to do when you first move into your home that will increase your safety and reduce the chance of any surprises that can lead into disappointment. First and foremost, Read over your Inspection report and read it well, don’t just skim over it. Understand it’s contents and follow the recommendations. Remember, any issues mentioned as Health and Safety are of most importance and should be carried out immediately. So lets get started:
Smoke and Carbon Monoxide detectors. I often recommend replacing the ones in the home with new ones just to be safe and lean on the side of caution. One never knows if they have been tampered with or damaged. They usually have a live cycle of about 10 yrs on average and this will also help you to remember when to replace them.
Label your electrical panel: It is important to have your panel labelled just incase of an emergency and a circuit needs to be shut down. Furthermore, if your panel is already labelled, make sure it is accurate. Make sure it shuts down the listed areas and also check your AFCI breakers and any GFCI receptacles once a month to make sure they are working and protecting you. Lastly, do the electrical improvements and recommendations in your report as soon as you can. It is for your safety.
Locate and label the Main shutoffs for your Plumbing, Electrical and Gas. It is important to know their locations and make sure everyone in the family knows where they are too. There is no worse feeling when you have a pipe burst, water is leaking everywhere and your family member doesn’t know where the shut off is while you’re at work.
Change all the locks on your doors and look into having a security system installed. Many times this equates to greater Insurance savings and peace of mind.
Change your laundry rubber hoses to stainless steel braided hoses. Rubber hoses have a greater probability of rupture and can cause quite a bit of water damage in a short amount of time.
These are just a few things you can do when you first move into your new home. Remember the old saying, an ounce of prevention is worth more than a pound of cure
Tony Coelho

Antonio is the principal Inspector at Ancoe Property Inspections. After graduating with High Honours from the Home Inspector Training Program at Sheridan College, he completed all requirements necessary…
You buy a house, you pay a guy with a brain to find flaws, issues etc. He finds them… tells you about them, makes a report… blablabla. The difference with Ancoe and Antonio is that he continues to help you afterwards.